
Create a Core Web Vitals Report in Looker Studio (GTM + BigQuery)
Google’s Core Web Vitals (CWV) are crucial for measuring real user experience across performance indicators like LCP, FID, CLS, INP, and more. This guide shows you how to capture CWV data using Google Tag Manager (GTM), push it to GA4, store it in BigQuery, and finally visualize it in Looker Studio (formerly Data Studio)—without relying on third-party plugins.
Step 1: Capture Core Web Vitals via Google Tag Manager
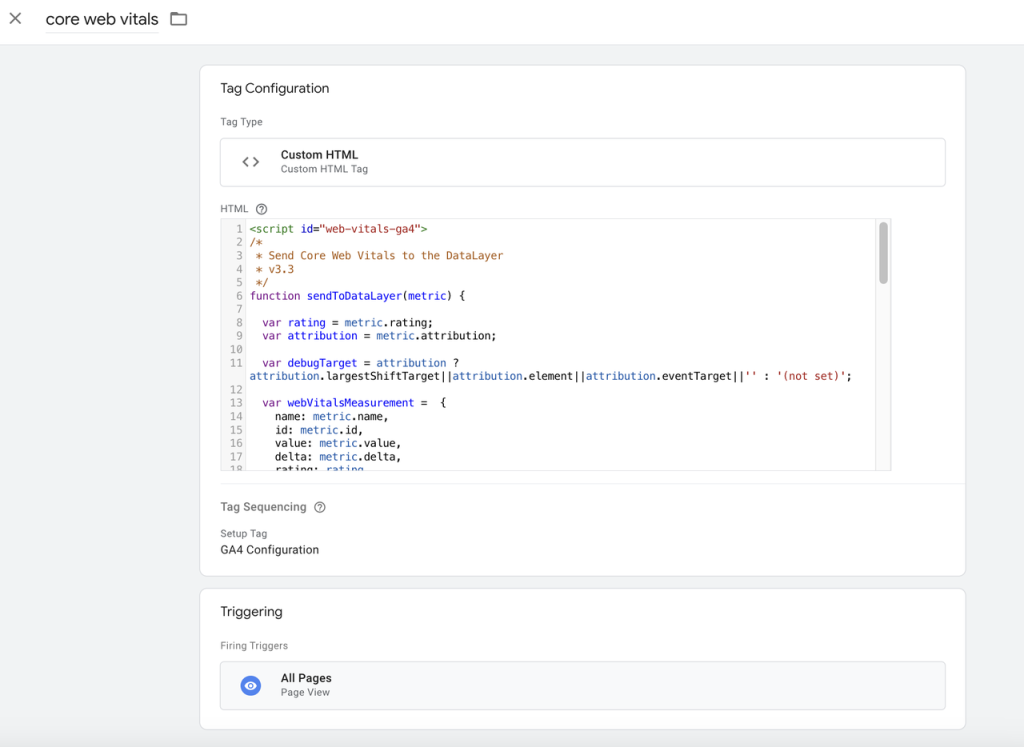
Start by injecting the web-vitals library into every page using a Custom HTML Tag in GTM. This script captures metrics like LCP, CLS, FID, INP, TTFB, and FCP, and pushes the data into the GTM dataLayer for each event.
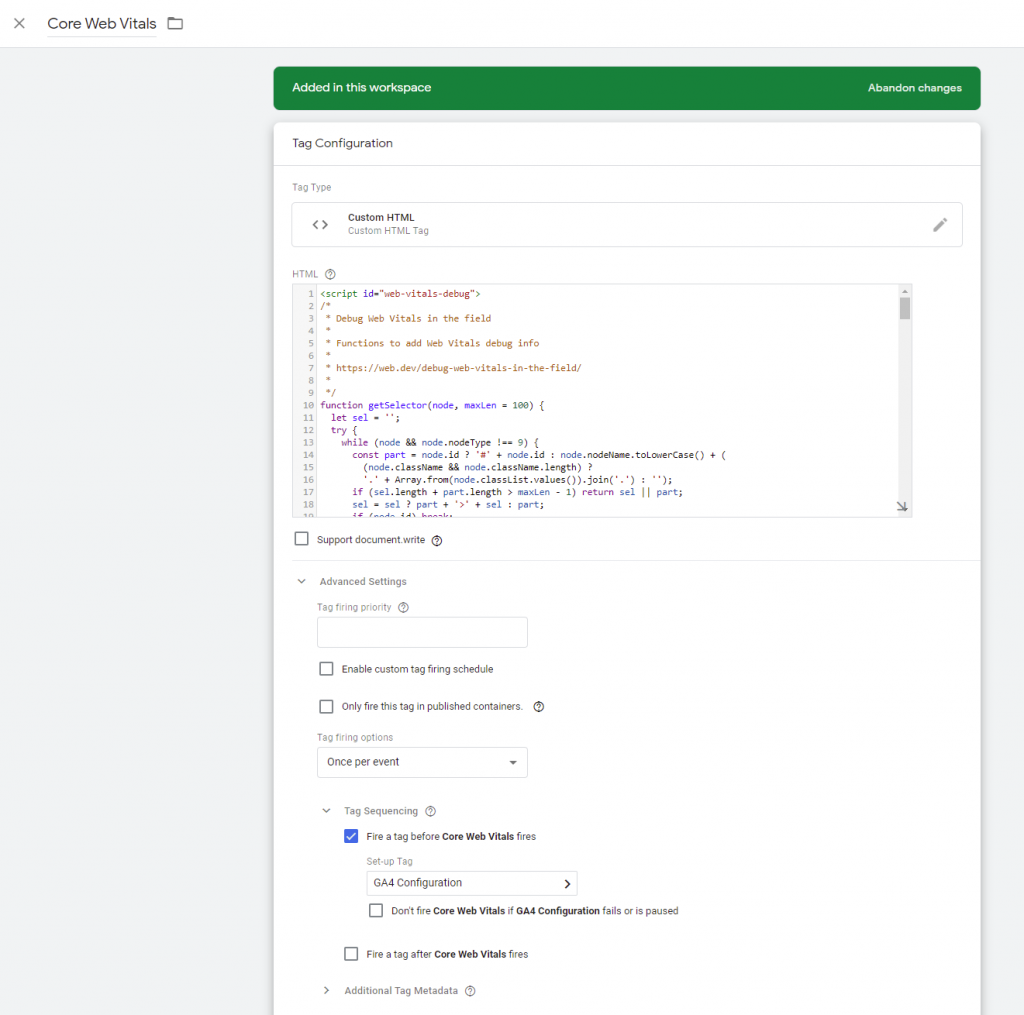
Be sure to configure tag sequencing so that your GA4 Configuration Tag fires before the CWV script runs.
Step by Step Instruction
- In GTM, create a Custom HTML tag called core web vitals
- Paste in the full CWV JavaScript snippet
- Mark “Support document.write”
Question: What is “Support document.write” and why enable it?
In the Custom HTML Tag Settings, there’s a checkbox: Support document.write
Why it matters: It allows GTM to safely execute older scripts that may rely on document.write() (a method that writes directly to the HTML document). The web-vitals CDN loader script in your snippet dynamically injects JavaScript via document.createElement, but enabling this setting ensures full compatibility with dynamic scripts like this one. If not checked, GTM might block or delay scripts that require synchronous or DOM-injection behavior, leading to missing metrics.
- Set the trigger to
All Pages
<script id="web-vitals-ga4">
/*
 * Send Core Web Vitals to the DataLayer
 * v3.3
 */
function sendToDataLayer(metric) {

  var rating = metric.rating;
  var attribution = metric.attribution;

  var debugTarget = attribution ? attribution.largestShiftTarget||attribution.element||attribution.eventTarget||'' : '(not set)';

  var webVitalsMeasurement =  {
    name: metric.name,
    id: metric.id,
    value: metric.value,
    delta: metric.delta,
    rating: rating,
    valueRounded: Math.round(metric.name === 'CLS' ? metric.value * 1000 : metric.value),
    deltaRounded: Math.round(metric.name === 'CLS' ? metric.delta * 1000 : metric.delta),
    debugTarget: debugTarget,
    debug_event_type: attribution ? attribution.eventType||'' : '',
    debugTiming: attribution ? attribution.loadState||'' : '',
    eventTime: attribution ? attribution.largestShiftTime||(attribution.lcpEntry&&attribution.lcpEntry.startTime)||attribution.eventTime||'': ''
  };

  dataLayer.push({
      event: 'coreWebVitals',
      webVitalsMeasurement: webVitalsMeasurement
  });
}
</script>
<script id="web-vitals-cdn">
/*
 * Using the web-vitals script from a CDN
 *
 * https://github.com/GoogleChrome/web-vitals#from-a-cdn
 *
 * Modified to call the sendToDataLayer function on events
 *
 */
(function() {
  var script = document.createElement('script');
  script.src = 'https://unpkg.com/[email protected]/dist/web-vitals.attribution.iife.js';
  script.onload = function() {
    // When loading `web-vitals` using a classic script, all the public
    // methods can be found on the `webVitals` global namespace.
    webVitals.onCLS(sendToDataLayer);
    webVitals.onFID(sendToDataLayer);
    webVitals.onLCP(sendToDataLayer);
    webVitals.onFCP(sendToDataLayer);
    webVitals.onTTFB(sendToDataLayer);
    webVitals.onINP(sendToDataLayer);
  }
  document.head.appendChild(script);
}())
</script>
Step 2: Ensure GA4 Configuration Fires First
Create a GA4 Configuration tag in GTM and set it to trigger on all pages. This ensures every CWV event is tied to the correct GA4 stream. You can find your Measurement ID in GA4 under Admin → Data Streams → Tag Settings.
Step by Step Instruction
- Go to create a GA4 Configuration Tag and fill up Tag ID, firing trigger will be All Pages, save it for now, we will come back later to GA4 Configuration
- How to find your Tag ID
- Go to Google Analytics.
- Sign in to your Google Account.
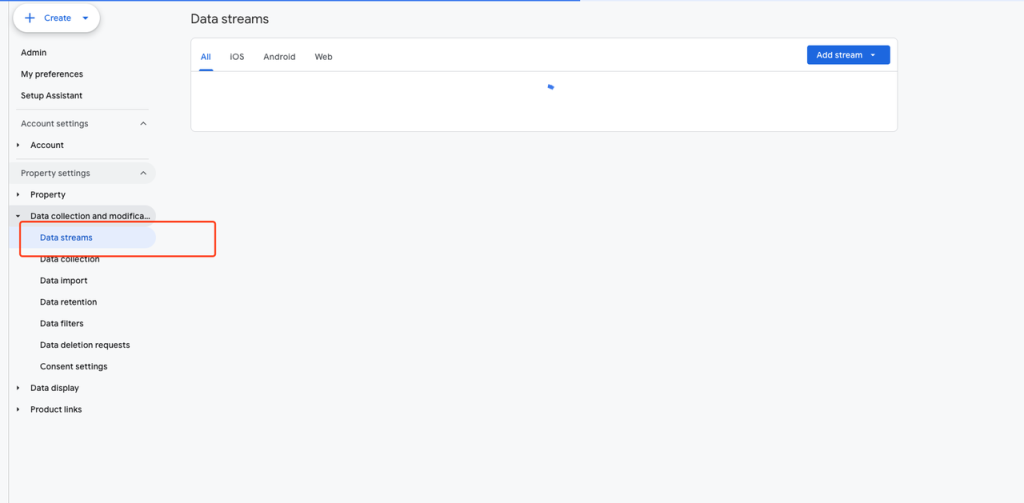
- In Admin, under Data collection and modification, select Data Streams.
- Note: The previous link opens to the last Analytics property you accessed. You can change the property using the property selector. You must be an Editor or above at the property level to open your Google tag settings.
- Select the data stream that you want to edit.
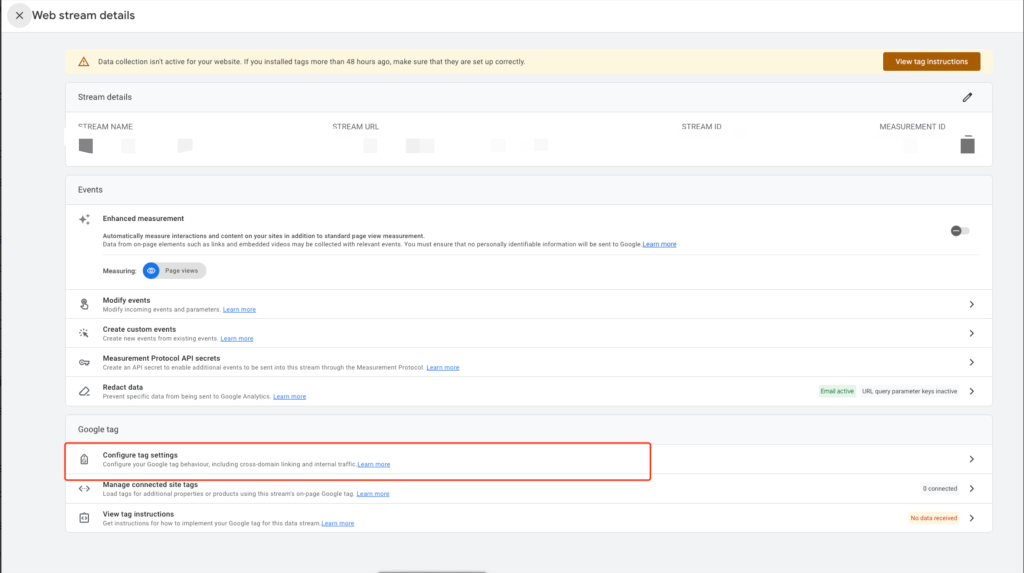
- Under Google tag, click Configure tag settings.
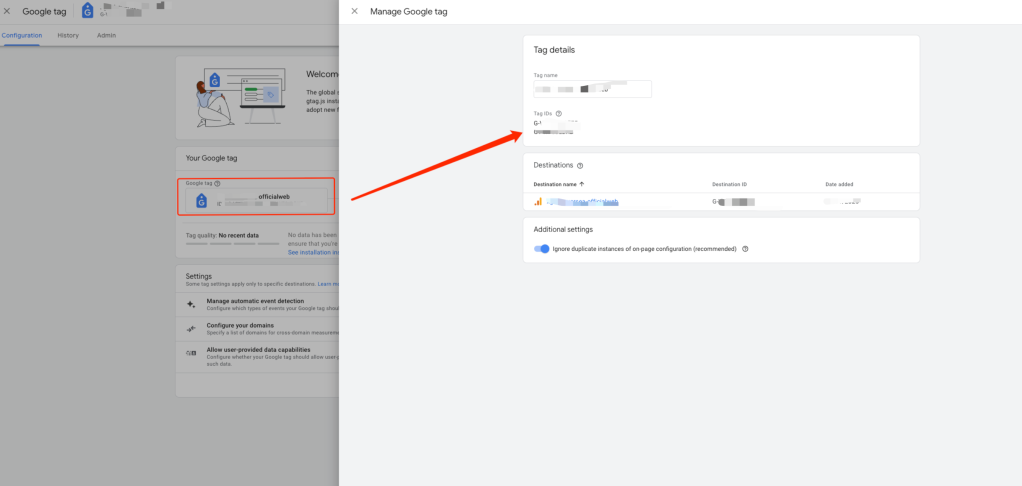
- Under Your Google tag, click the Google tag.
- Under Tag details, copy the Google tag ID.
- If you see multiple IDs, always use the ID starts with G-XXXXXXX
- Set the trigger to
All Pages
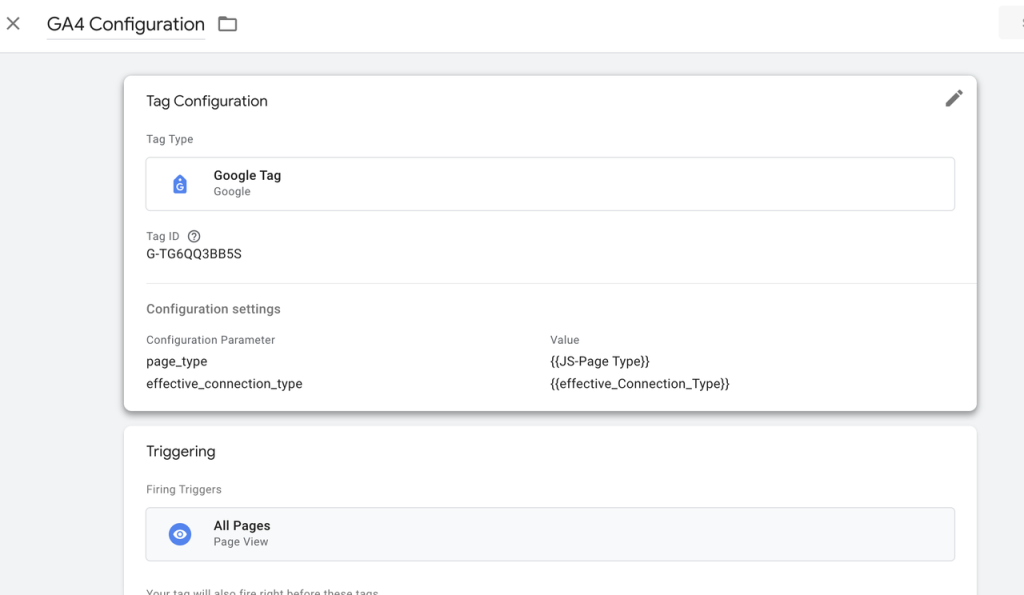
- Then go back to core web vitals to add in tag sequencing, set it to fire **before Core Web Vitals(**In Tag Sequencing, ensure “Fire after GA4 Configuration” is checked)
Step 3: Define Data Layer Variables in GTM
To extract CWV metrics from the dataLayer, create a series of Data Layer Variables (DLVs) in GTM.
You can also create custom JavaScript variables to categorize:
- Page type (e.g., home, blog, profile, landing)
- Effective connection type (e.g., 4g, 3g)
These enrich your GA4 events with helpful metadata for the future analysis.
Step by Step Instruction
- Create Data Layer Variables (DLVs) in GTM:
webVitalsMeasurement.namewebVitalsMeasurement.idwebVitalsMeasurement.valuewebVitalsMeasurement.deltawebVitalsMeasurement.ratingwebVitalsMeasurement.debugTarget, etc.
| Variable name | Data Layer Variable Name |
|---|---|
| DLV – webVitalsMeasurement.name | webVitalsMeasurement.name |
| DLV – webVitalsMeasurement.id | webVitalsMeasurement.id |
| DLV – webVitalsMeasurement.value | webVitalsMeasurement.value |
| DLV – webVitalsMeasurement.delta | webVitalsMeasurement.delta |
| DLV – webVitalsMeasurement.valueRounded | webVitalsMeasurement.valueRounded |
| DLV – webVitalsMeasurement.deltaRounded | webVitalsMeasurement.deltaRounded |
| DLV – webVitalsMeasurement.debugTarget | webVitalsMeasurement.debugTarget |
| DLV – webVitalsMeasurement.debugEventType | webVitalsMeasurement.debugEventType |
| DLV – webVitalsMeasurement.debugTiming | webVitalsMeasurement.debugTiming |
| DLV – webVitalsMeasurement.eventTime | webVitalsMeasurement.eventTime |
| DLV – webVitalsMeasurement.rating | webVitalsMeasurement.rating |
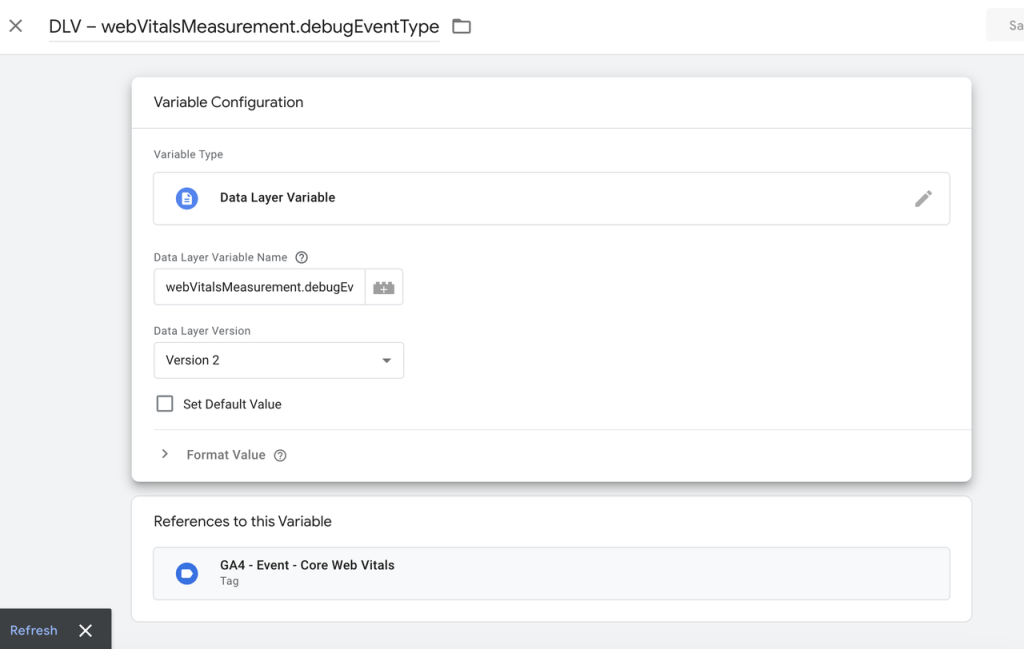 |
- Also define:
JS-Page Type(for page categorization)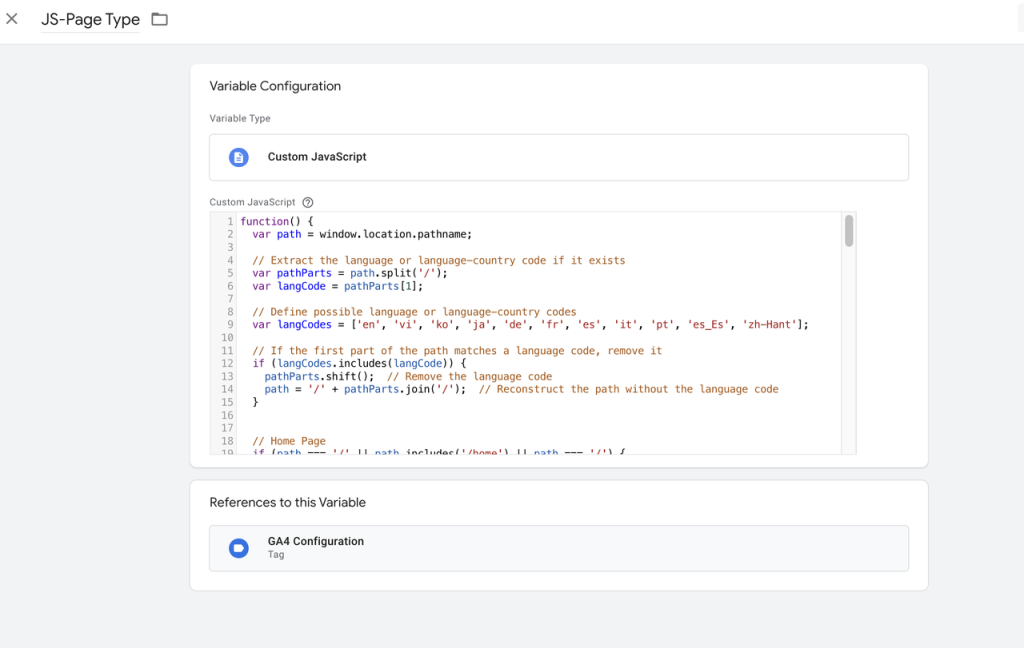
function() {
  var path = window.location.pathname;

  // Extract the language or language-country code if it exists
  var pathParts = path.split('/');
  var langCode = pathParts[1];

  // Define possible language or language-country codes
  var langCodes = ['en', 'vi', 'ko', 'ja', 'de', 'fr', 'es', 'it', 'pt', 'es_Es', 'zh-Hant'];

  // If the first part of the path matches a language code, remove it
  if (langCodes.includes(langCode)) {
    pathParts.shift();  // Remove the language code
    path = '/' + pathParts.join('/');  // Reconstruct the path without the language code
  }


  // Home Page
  if (path === '/' || path.includes('/home') || path === '/') {
    return 'home';
  }

  // Include specific payment pages
  if (path.includes('/payment/combo-sub') || path.includes('/payment/combo_proceed')) {
    return 'payment';
  }

  // Start Page
if (path === '/start') {
    return 'start';
}

  // Blog
  if (path.includes('/blog')) {
    return 'blog';
  }

  // Collaboration
  if (path.includes('/collaborate')) {
    return 'collaborate';
  }

  // Company Information
  if (path.includes('/company')) {
    return 'company';
  }

  // Download Pages
  if (path.includes('/download')) {
    return 'download';
  }

  // Help/Support
  if (path.includes('/help')) {
    return 'help';
  }

  // Landing Pages
  if (path.includes('/landing')) {
    return 'landing';
  }

  // Profile
  if (path.includes('/profile')) {
    return 'profile';
  }

  // Search
  if (path.includes('/search')) {
    return 'search';
  }

  // Features
  if (path.includes('/features')) {
    return 'features';
  }

  // Policy
  if (path.includes('/policy')) {
    return 'policy';
  }

  // RDM
  if (path.includes('/rdm')) {
    return 'rdm';
  }

  // Welfare
  if (path.includes('/welfare')) {
    return 'welfare';
  }

  // Redirects
  if (path.includes('/redirect')) {
    return 'redirect';
  }

  // Default to 'other' if no matches
  return 'other';
}
effective_Connection_Type(network context)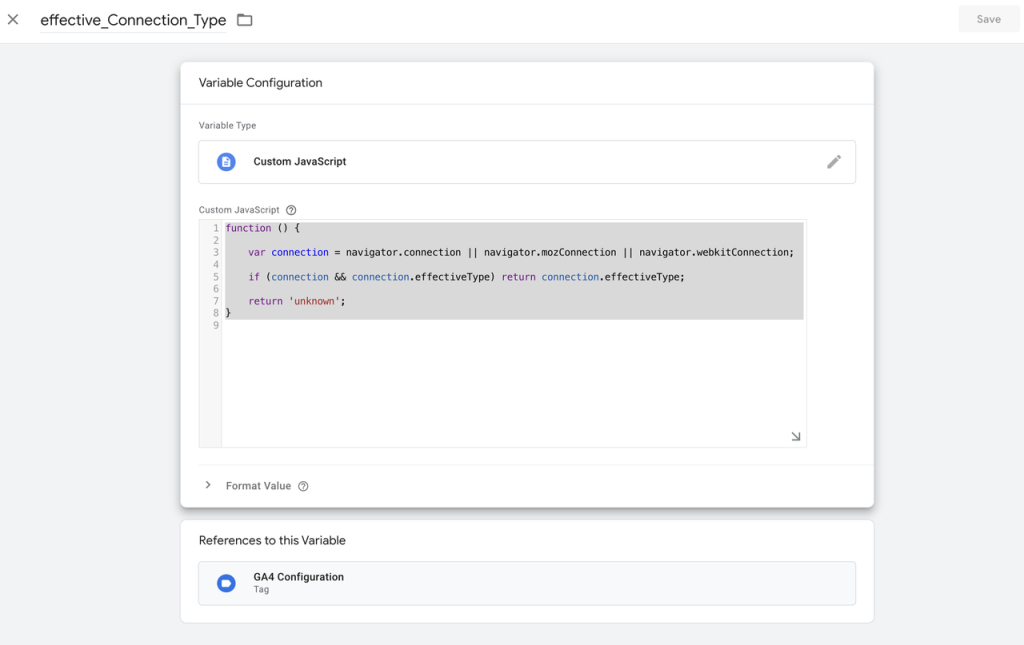
function () {

    var connection = navigator.connection || navigator.mozConnection || navigator.webkitConnection;

    if (connection && connection.effectiveType) return connection.effectiveType;

    return 'unknown';
}
Step 4: Edit GA4 Configuration with Page Types and Connection Types
Step by Step Instruction
- Edit the GA4 Configuration tag
- Add these custom parameters:
page_type(Custom JS: JS-Page Type)effective_connection_type(Custom JS)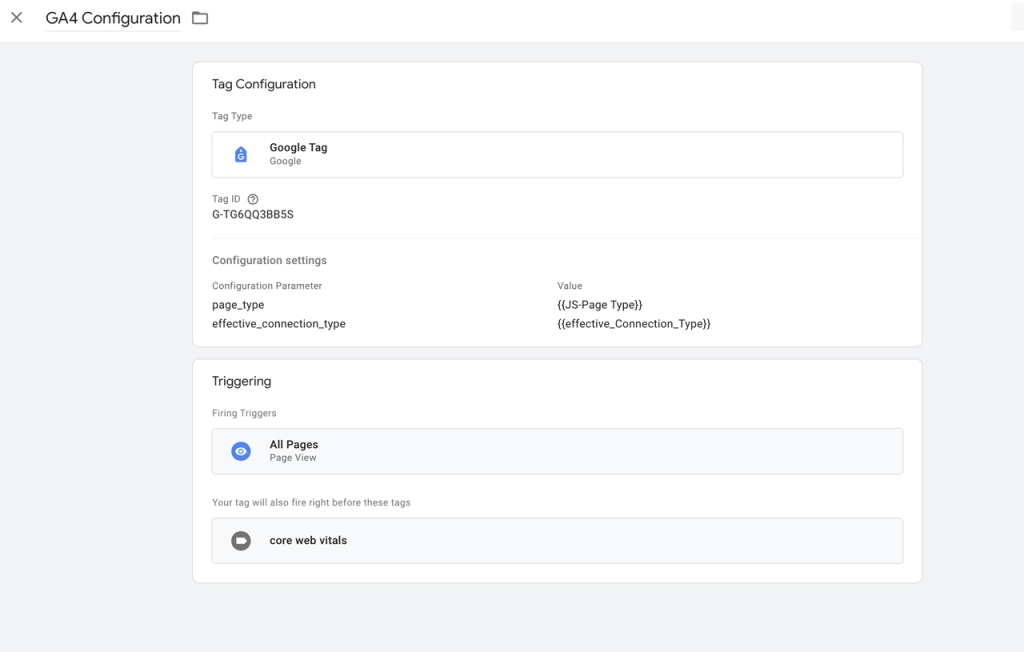
Step 5: Time to Trigger coreWebVitals Event
Now that your CWV script pushes an event (coreWebVitals) to the dataLayer, you need a Custom Event Trigger in GTM that listens for it. Set the trigger to fire on All Custom Events named coreWebVitals.
Step by Step Instruction
- In GTM, create a Trigger of type
Custom Event - Event name:
coreWebVitals - Fires on:
All Custom Events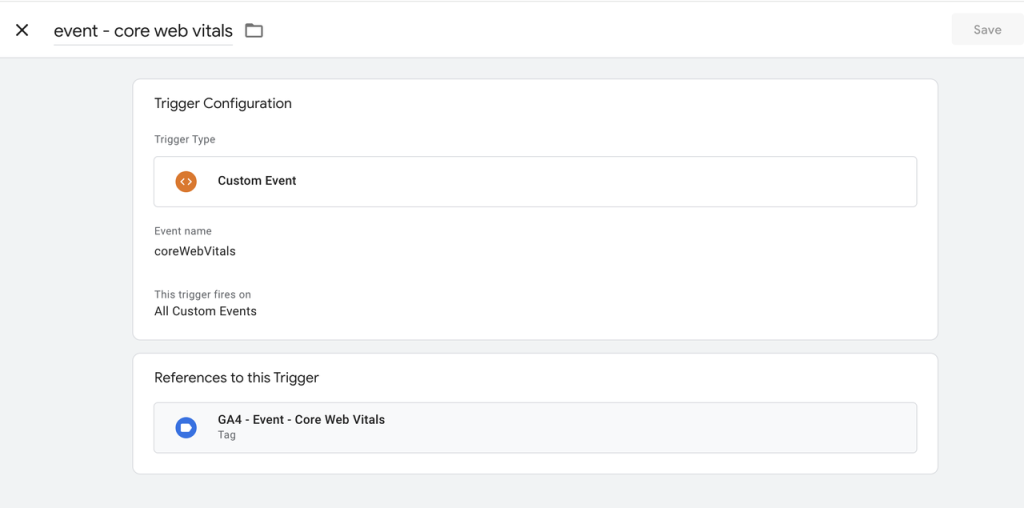
Step 6: Configure GA4 Event Tag
Step by Step Instruction
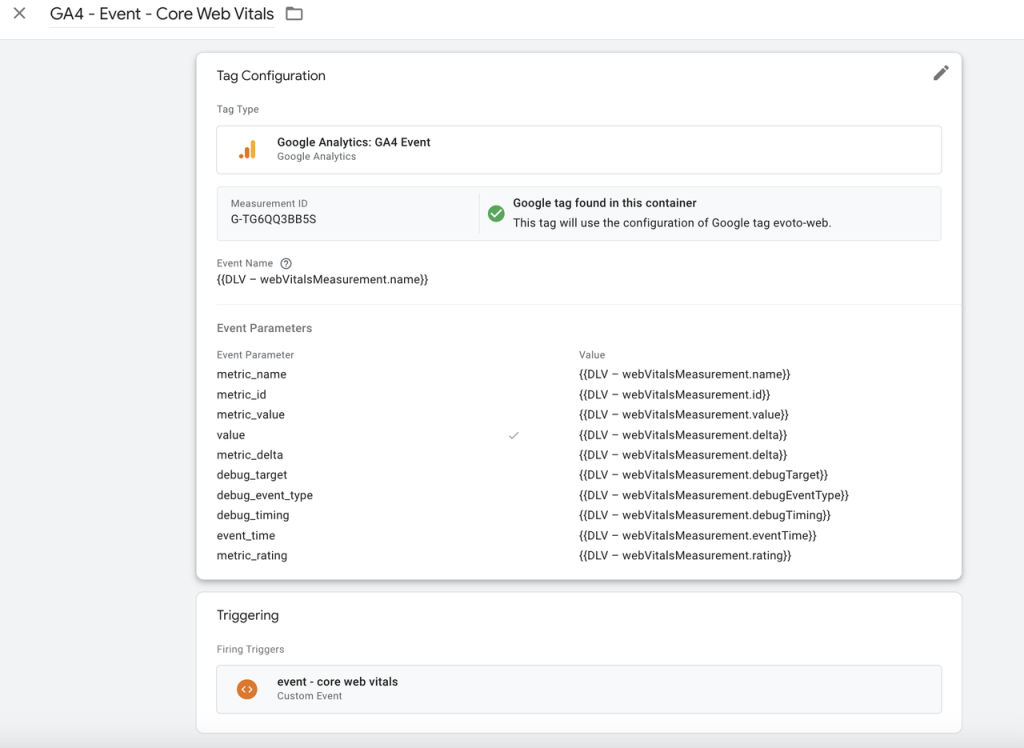
- In GTM, create a GA4 Event tag
- Use your GA4 Measurement ID
- Event Name:
{{DLV – webVitalsMeasurement.name}} - Add Event Parameters like:
metric_idmetric_valuemetric_ratingdebug_target, etc.
- Trigger: use event – core web vitals custom event trigger
| Parameter name | Value |
|---|---|
| metric_name | {{DLV – webVitalsMeasurement.name}} |
| metric_id | {{DLV – webVitalsMeasurement.id}} |
| metric_value | {{DLV – webVitalsMeasurement.value}} |
| value | {{DLV – webVitalsMeasurement.delta}} |
| metric_delta | {{DLV – webVitalsMeasurement.delta}} |
| debug_target | {{DLV – webVitalsMeasurement.debugTarget}} |
| debug_event_type | {{DLV – webVitalsMeasurement.debugEventType}} |
| debug_timing | {{DLV – webVitalsMeasurement.debugTiming}} |
| event_time | {{DLV – webVitalsMeasurement.eventTime}} |
| metric_rating | {{DLV – webVitalsMeasurement.rating}} |
 |
Step 7: Link GA4 Property to BigQuery
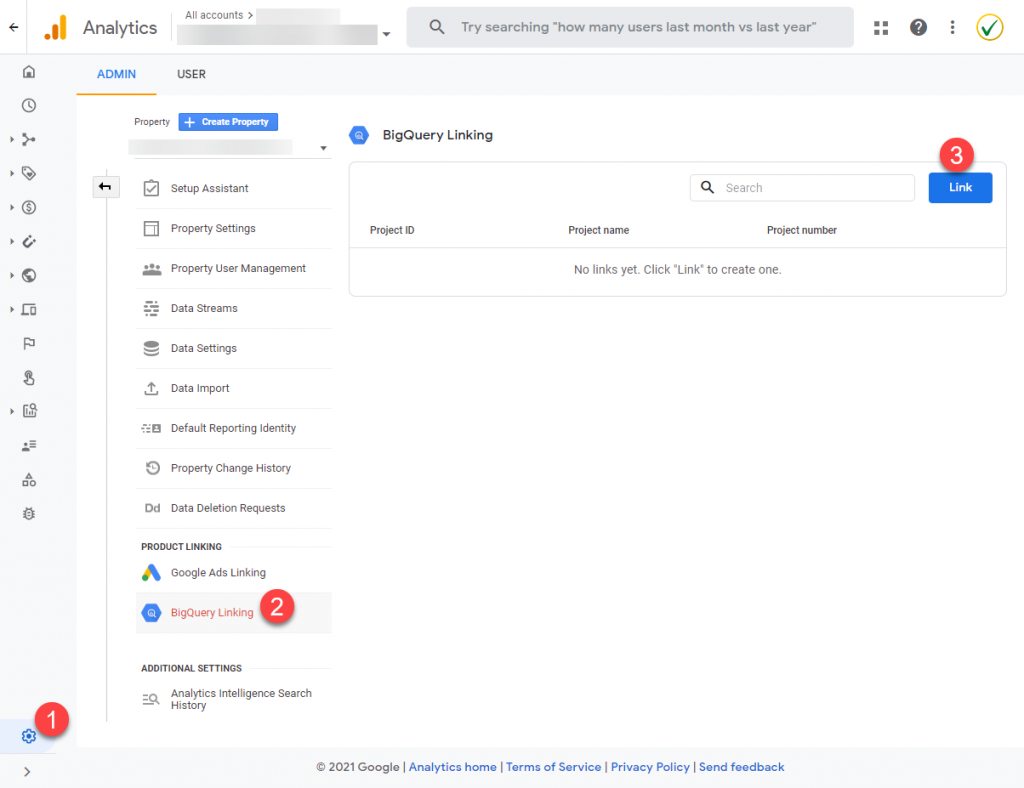
Head to GA4 → Admin → BigQuery Linking, and link your GA4 property to your BigQuery project. This allows your GA4 event data (including CWV metrics) to flow directly into BigQuery for deeper analysis and visualization.
Step by Step Instruction
- Go to GA4 Admin > BigQuery Linking
- Click “Link”, select the Cloud project and BigQuery dataset
- Choose Daily Export(You will get 10GB for free for the first time user, and then will charge based on your consumption, for example $5/TB)
Step 8: Create View or Materialized Table in Bigquery
Use a BigQuery SQL script to transform raw GA4 events into a summary table like web_vitals_summary. This query aggregates the CWV data with context like:
- Device type, page path, session info
- Engagement and traffic source
- Metric rating classification (Good, Needs Improvement, Poor)
This table becomes the primary data source for your Looker Studio dashboard.
Step by Step Instruction
- Use the BigQuery materialization SQL script (from the source blog)
- Replace placeholders like:
evtest-358502with your project IDanalytics_325275919with your dataset ID
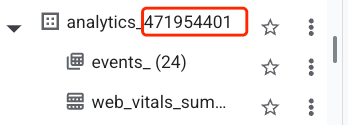
How to find dataset ID?
- Open the BigQuery UI
- On the left-hand side under Explorer, expand your project
- You’ll see one or more datasets — these are your Dataset IDs
- For GA4-linked projects, the format is often:
analytics_<PROPERTY_ID>- Click the dataset, and then click on any table to confirm you’re using the right one
- Run the script to create
web_vitals_summarytable
# Web Vitals Materialised Table v3.4
# https://github.com/Tiggerito/GA4-Scripts/blob/main/core-web-vitals/bigquery-materialize-table-web-vitals.sql

# Replace all occurances of DatasetID with your Dataset ID

#${ProjectID}.${DatasetID}.web_vitals_summary
CREATE OR REPLACE TABLE `evtest-358502.analytics_325275919.web_vitals_summary` # Replace DatasetID with your Dataset ID
  PARTITION BY DATE(event_timestamp)
  CLUSTER BY metric_name
AS
SELECT
  CURRENT_TIMESTAMP() AS last_updated,
  ga_session_id,
  IF(
    EXISTS(SELECT 1 FROM UNNEST(events) AS e WHERE e.event_name = 'first_visit'),
    'New user',
    'Returning user') AS user_type,
  IF(
    (SELECT MAX(session_engaged) FROM UNNEST(events)) > 0, 'Engaged', 'Not engaged')
    AS session_engagement,
  evt.* EXCEPT (session_engaged, event_name),
  event_name AS metric_name,

  # Tony's additions 1 START
  CASE metric_rating
    WHEN 'good' THEN 'Good'
    WHEN 'ni' THEN 'Needs Improvement'
    WHEN 'needs-improvement' THEN 'Needs Improvement'
    WHEN 'poor' THEN 'Poor'
    ELSE metric_rating
  END AS metric_status
  # Tony's additions 1 END

FROM
  (
    SELECT
      ga_session_id,
      ARRAY_AGG(custom_event) AS events
    FROM
      (
        SELECT
          ga_session_id,
          STRUCT(
            country,
            call_timestamp,
            call_sequence,
            page_timestamp,
            device_category,
            device_os,
            traffic_medium,
            traffic_name,
            traffic_source,
            page_path,
            # Tony's modification to support long debug_target
            IF(debug_target2 IS NULL, debug_target, CONCAT(debug_target, debug_target2)) AS debug_target,
            event_timestamp,
            event_date,
            event_name,
            metric_id,
            # Tony's modification to also support TTFB and FCP
            IF(event_name = 'LCP' OR event_name = 'TTFB' OR event_name = 'FCP', metric_value / 1000, metric_value) AS metric_value,
            user_pseudo_id,
            session_engaged,
            session_revenue,

            # Tony's additions 2 START
            metric_rating,
            page_location,
            page_type,
            continent,
            region,
            device_browser,
            effective_connection_type,
            save_data,
            width,
            height
            # Tony's additions 2 END

            ) AS custom_event
        FROM
          (
            SELECT
              (SELECT value.int_value FROM UNNEST(event_params) WHERE key = 'ga_session_id') AS ga_session_id, # can be null in consent mode
              (SELECT value.string_value FROM UNNEST(event_params) WHERE key = 'metric_id') AS metric_id,

              SAFE.TIMESTAMP_MILLIS(ANY_VALUE((SELECT value.int_value FROM UNNEST(event_params) WHERE key = 'call_timestamp'))) AS call_timestamp, # not sure what use this has. We also have event_timestamp
              ANY_VALUE((SELECT value.int_value FROM UNNEST(event_params) WHERE key = 'call_sequence')) AS call_sequence, # not sure what use this has especially when set to ANY_VALUE
              SAFE.TIMESTAMP_MILLIS(ANY_VALUE((SELECT CAST(COALESCE(value.double_value, value.int_value) AS INT64) FROM UNNEST(event_params) WHERE key = 'page_timestamp'))) AS page_timestamp,

              ANY_VALUE(device.category) AS device_category,
              ANY_VALUE(device.operating_system) AS device_os,
              ANY_VALUE(traffic_source.medium) AS traffic_medium,
              ANY_VALUE(traffic_source.name) AS traffic_name,
              ANY_VALUE(traffic_source.source) AS traffic_source,
              ANY_VALUE(
                REGEXP_SUBSTR(
                  (SELECT value.string_value FROM UNNEST(event_params) WHERE key = 'page_location'),
                  r'^[^?]+')) AS page_path,

              ANY_VALUE(
                (SELECT value.string_value FROM UNNEST(event_params) WHERE key = 'debug_target'))
                AS debug_target,
                # Tony's modification to support long debug_target values (over 100 characters)
              ANY_VALUE(
                (SELECT value.string_value FROM UNNEST(event_params) WHERE key = 'debug_target2'))
                AS debug_target2,
              ANY_VALUE(user_pseudo_id) AS user_pseudo_id,
              ANY_VALUE(geo.country) AS country,
              ANY_VALUE(event_name) AS event_name,
              SUM(ecommerce.purchase_revenue) AS session_revenue,
              MAX(
                (
                  SELECT
                    COALESCE(
                      value.double_value, value.int_value, CAST(value.string_value AS NUMERIC))
                  FROM UNNEST(event_params)
                  WHERE key = 'session_engaged'
                )) AS session_engaged,
              TIMESTAMP_MICROS(MAX(event_timestamp)) AS event_timestamp,
              MAX(PARSE_DATE('%Y%m%d', event_date)) AS event_date,
              MAX(
                (
                  SELECT COALESCE(value.double_value, value.int_value)
                  FROM UNNEST(event_params)
                  WHERE key = 'metric_value'
                )) AS metric_value,

                # Tony's additions 3 START
                ANY_VALUE((SELECT value.string_value FROM UNNEST(event_params) WHERE key = 'metric_rating')) AS metric_rating,
                ANY_VALUE((SELECT value.string_value FROM UNNEST(event_params) WHERE key = 'page_location')) AS page_location,
                ANY_VALUE((SELECT COALESCE(value.string_value, CAST(value.int_value AS STRING)) FROM UNNEST(event_params) WHERE key = 'page_type')) AS page_type,
                ANY_VALUE(geo.continent) AS continent,
                ANY_VALUE(geo.region) AS region,
                ANY_VALUE(device.web_info.browser) AS device_browser,
                ANY_VALUE((SELECT value.string_value FROM UNNEST(event_params) WHERE key = 'effective_connection_type')) AS effective_connection_type,
                ANY_VALUE((SELECT value.string_value FROM UNNEST(event_params) WHERE key = 'save_data')) AS save_data,
                ANY_VALUE((SELECT value.int_value FROM UNNEST(event_params) WHERE key = 'width')) AS width,
                ANY_VALUE((SELECT value.int_value FROM UNNEST(event_params) WHERE key = 'height')) AS height
                # Tony's additions 3 END

#${ProjectID}.${DatasetID}.events_*
            FROM
              `evtest-358502.analytics_325275919.events_*` # Replace DatasetID with your Dataset ID
            WHERE
              # Tony's modification to support TTFB and FCP and INP
              event_name IN ('LCP', 'FID', 'CLS', 'TTFB', 'FCP', 'INP', 'first_visit', 'purchase')
            GROUP BY
              1, 2
          )
      )
    WHERE
      ga_session_id IS NOT NULL
    GROUP BY ga_session_id # can be null in consent mode ?
  )
CROSS JOIN UNNEST(events) AS evt
WHERE evt.event_name NOT IN ('first_visit', 'purchase');
Step 9: Build Looker Studio Dashboard
Step by Step Instruction
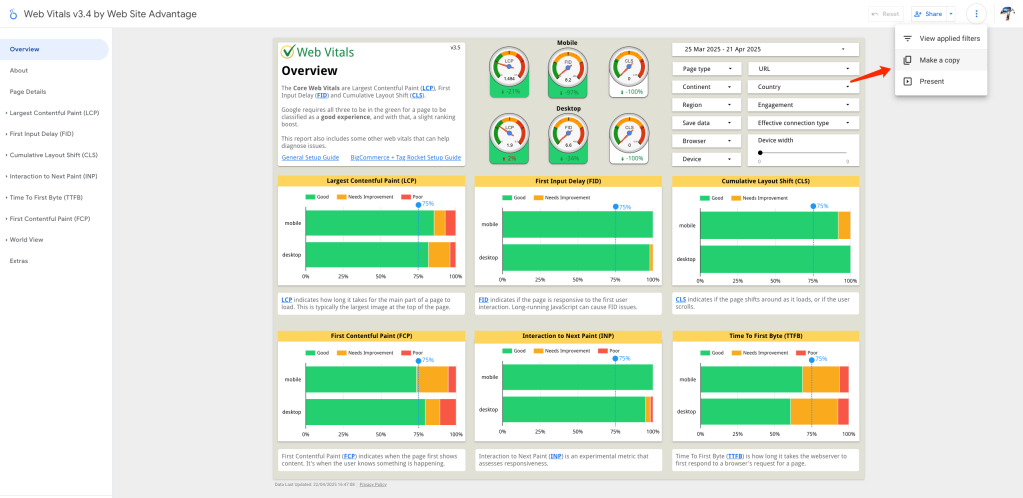
- Open the [Core Web Vitals Looker Studio Template] (Thanks to Bigecommerce)
- Click “Make a copy”
- Replace the data source with your web_vitals_summary table
- Customize charts and filters (e.g., device type, metric rating, region)
Glossary / Key Terms
- Core Web Vitals: User-centric performance metrics defined by Google
- GTM: Google Tag Manager, used to inject scripts/tags into your website
- GA4 Event Tag: Sends a specific user interaction or metric to GA4
- Data Layer Variable: Lets GTM extract structured values pushed via JavaScript
- Trigger: A condition that causes a GTM tag to fire
- BigQuery: Google’s serverless data warehouse for storing and analyzing large datasets
- Looker Studio: Google’s dashboarding and reporting tool (formerly Data Studio)
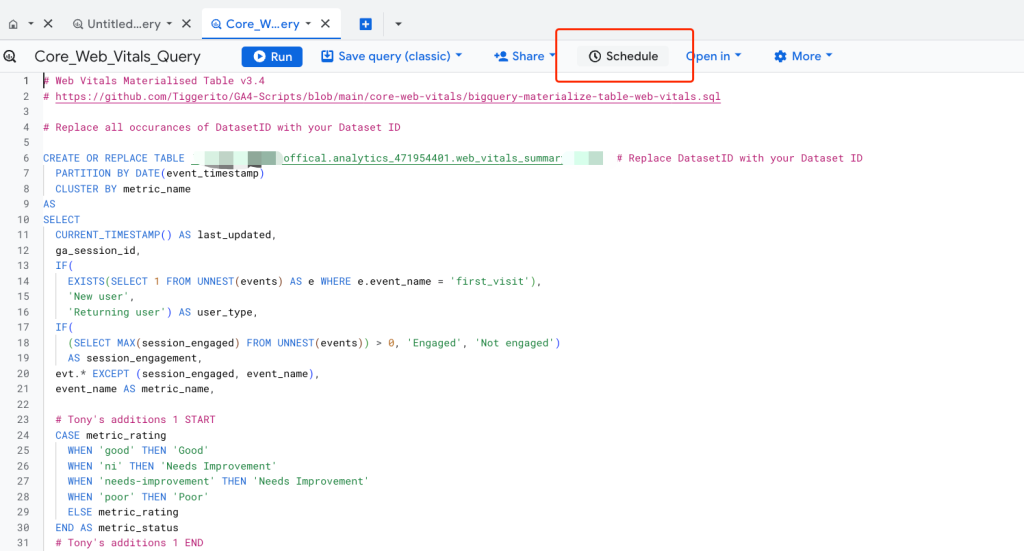
You can even schedule report delivery in Bigquery for ongoing monitoring:
- In the top right corner of the query editor, click the “Schedule” dropdown → **“Schedule query”
- A side panel will appear:
- Name your job (e.g.,
CWV Daily Summary) - Choose frequency:
- Daily / Hourly / Weekly / Custom cron expression
- Choose start time (based on your time zone)
- Choose destination table:
- If you’re running a
CREATE OR REPLACEquery like you are now, this is handled automatically.
- If you’re running a
- You can also enable email notifications on failure
- click schedule
- **** Note: You need to add your credit card or any payment method accepted by Bigquery for schedule to run automatically.
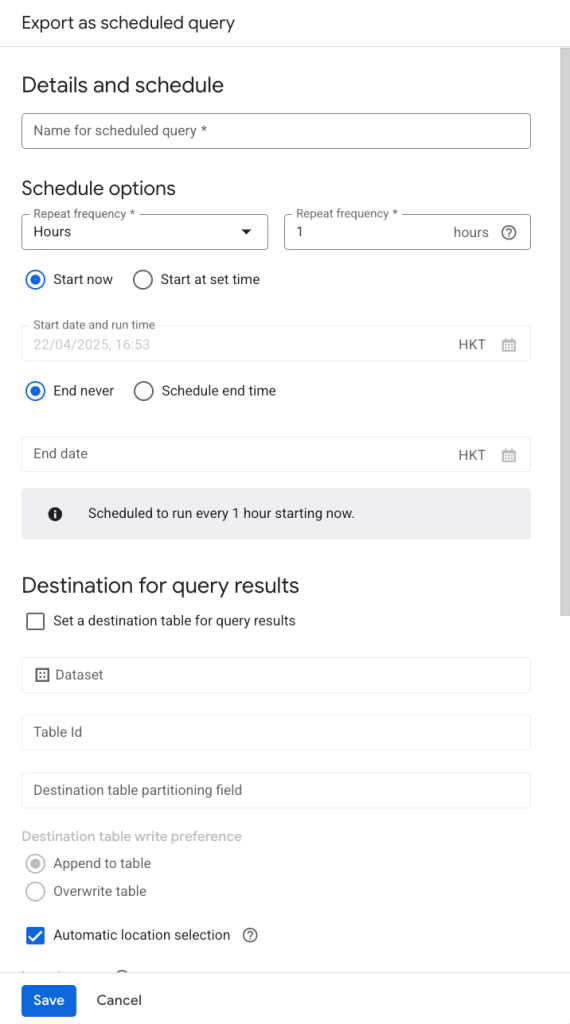
- Name your job (e.g.,
Final Notes
By combining GTM, GA4, BigQuery, and Looker Studio, you unlock a complete Core Web Vitals analytics pipeline that is powerful, flexible, and entirely under your control. Whether you’re an SEO specialist, developer, or analyst, this setup provides the clarity and depth needed to optimize user experience at scale.
Need help generating the SQL materialization script or customizing your Looker Studio template? Let me know—we can assist. Click here to contact me.